Nice Rack! (for 19" rack gear)
I build a 19" rack to tidy up my home recording space.
A little while ago I thought I would tidy up my mess of a recording setup. The best way to do this you ask? A rack! Today I will outline the process involved and maybe even post up some plans.
So, racks are useful for tidying up all that rackmounted gear and making the setup look all the more professional. You can of course buy premade racks as studio furnature, but they are generally pretty expensive. So, I decided to make my own. First some design constraints.
- Should be cheap!
- Should look good (great)
- Should be around 10-12U in size
- Sturdy
- On wheels
After looking around, I decided to build a 12U rack. I originally had drawn up plans for a 10U one using mounting strips from Allans Music. However, it turns out that Derringers could sell me 2 metres for the rack stripping for the same price! So, this design is for 12 units, and I’ve got a bit spare for some extra things later.
Shopping List
Here’s what you’ll need to build this thing:
- 24 units worth of rack stripping. Or if you prefer, you can mount the rack gear by screwing into wood.
- 1/2 sheet (1600×600) of 16mm board of some kind.
- Iron on veneer strips for the visible edges of the board
- 4 casters so the rack will roll around easily
- Screws and glue
And thats it. I used Meranti veneered particle board for mine because it was all I could find as a 1/2 sheet. What you choose will depend on the look you want, but don’t get anything thinner than 16mm, you want this to be able to support the gear.
Planning it out
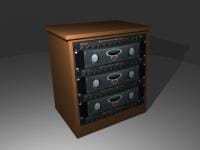
Before I cut anything, I did some planning in Maya of all programs. Maya doesn’t do real world measurements *that* well but I made do. Basically I needed to make sure of the dimensions before I bought anything. Needed to have the design figured out before any money changed hands. Below is a render from maya showing the rough design.

Once I had the 3D design working I drew it up in 2D to get it to fit onto a sheet of particle board. As it turns out we only need a 1/2 sheet for this rack.
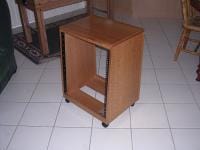
Construction is fairly straight forward. Cut all the pieces, and join them together by screwing and gluing butt joints. No fancy stuff here. Once the main frame is assembled you iron on the stripping to all the visible edges of the board. Finally, a few coats of clear and the rack was done. Here is the final result:

Some things to think about
If you are thinking about making something like this, you’ll want to play with this design to find something that works for you. For example, you might need a cabinet with a greater depth. Mine is fairly narrow, for example if you wanted to mount a computer case in there, it would stick out the back. This isn’t a problem because I only plan on having fairly shallow studio gear in it.
BIG DISCLAIMER: After building this everything fits nicely, but there is pretty much no gap on the sides of the rack gear. If I did this again it would be a couple of mm wider. Just letting you know that you HAVE to make sure your gear fits before you start putting it all together. Measure twice, cut once!
Useful Links
This design came about after looking at a lot of commercially made racks available, and of course some of the great DIY jobs seen in different forums. The main ones:
metalhead28’s rack
andycerrone’s rack
fabfour1257’s design
The Plans
And without further delay, the PDF: